

Transform Your Furniture: The Ultimate Guide to Painting Upholstery
|
|
Time to read 11 min
|
|
Time to read 11 min


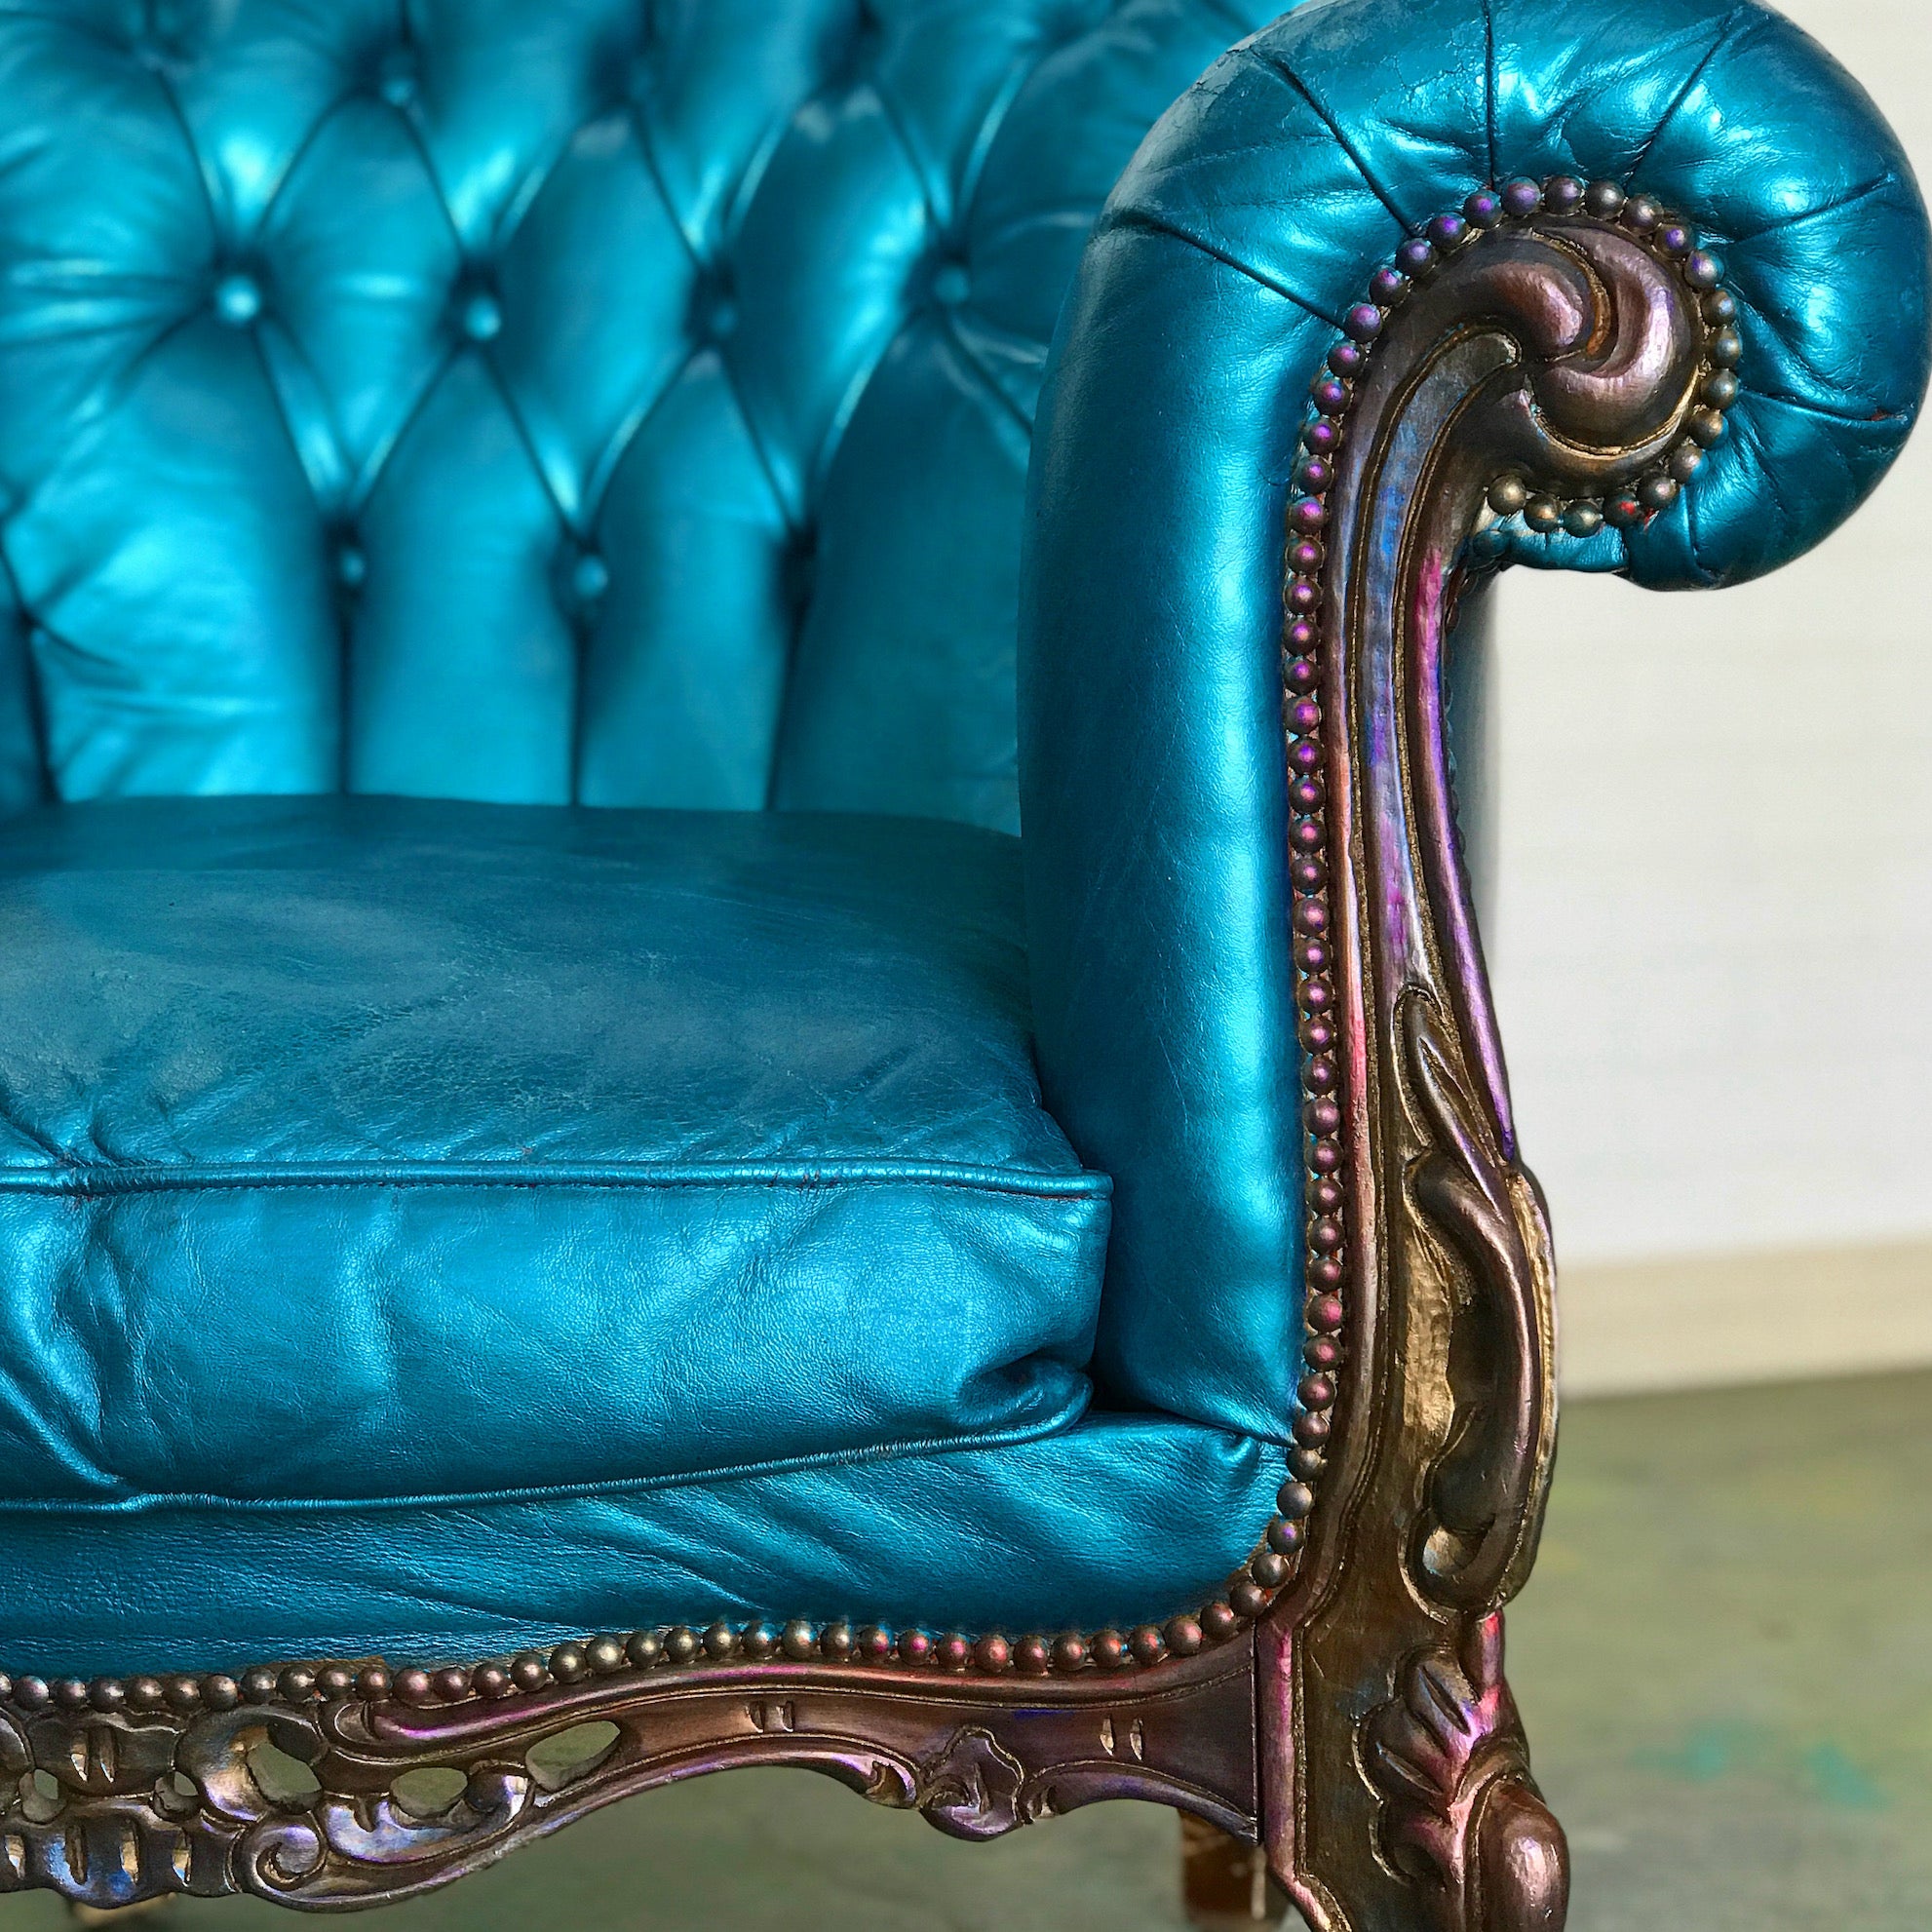
Table of contents
Great Question! In today's blog you are gonna learn 5 different tried and true ways to paint upholstery. If you've ever wanted to a new couch or chair (or boots) but your budget was holding you back, I'm gonna teach you how you can transform it with just a bit of paint and imagination.
If you’ve ever stared at a tired old sofa and thought, “You’d be perfect if only you weren’t that shade of sad beige,” then welcome to my world.
I’m Tanglewood Sue — artist, maximalist, and serial furniture rescuer — and I’ve been painting upholstery long enough to know there’s way more than one way to do it.
Most tutorials out there show a single method and call it a day. But here’s the truth: the “right” way to paint a couch, chair, or sofa depends entirely on the piece in front of you. Different fabrics, textures, and styles demand different approaches — and I’ve tested them all (so you don’t have to ruin your favorite armchair learning the hard way).
In this ultimate guide, I’ll walk you through every major upholstery-painting method — from dyeing and straight-up painting to my signature Leatherize It! finish, my shimmering Sue-per Shift technique, and even how to add patterns with stencils. I’ll break down what works best for each surface, what to avoid (looking at you, fabric softener hack), and how to get results that actually feel good to sit on.
Whether your style is dopamine décor, maximalism, or just “making what I already own fabulous again,” you’ll find everything you need right here — plus links to my top YouTube tutorials if you want to see each process in action.
Before we dive into brushes and fabric mediums, let’s talk about why painted upholstery has become one of my favorite DIY transformations.
1. It’s the ultimate budget makeover.
Reupholstering a sofa can cost hundreds, even thousands,of dollars. Painting or dyeing it? Often less than $50 in materials.
2. It’s sustainable and guilt-free.
Every time you repaint rather than replace, you keep one more perfectly good piece of furniture out of the landfill. (Mother Earth says thank you.)
3. You get total creative freedom.
Want a lavender velvet chair that shifts to turquoise when the light hits? Or a thrifted couch that suddenly looks like supple leather? Yep — you can do that.
4. It’s dopamine décor heaven.
Forget beige minimalism — this is your chance to experiment with bold color, pattern, and texture. Whether you’re into maximalist layering or simply want your living room to feel happy again, painted upholstery opens the door to joyful design.
5. Because it works!
Done correctly, painted upholstery can last for years. It doesn’t have to feel crunchy, crack, or transfer onto your clothes. (I’ll show you exactly how to avoid those pitfalls below.)
So if you’re ready to revive that old couch and turn it into a showstopper, keep reading — because next, I’ll show you the five different methods you can use, when each one shines, and how to pick the perfect approach for your project.
(Best for natural fibers and tightly woven fabrics like cotton, linen, and canvas)
This is the method that surprises people most -yes, you can dye your furniture instead of painting it. My go-to paint will always be Miss Lillian's All-In-One Paint because it has a built in top coat as well as more pigment than regular paints.
Unlike paint, which sits on top of fibers, dye soaks in and becomes part of the fabric. The result is a softer, and more flexible watercolor like finish.
Pros:
Maintains the original texture of the fabric
Deep, natural-looking color absorption
Easy to layer or mix tones
Cons:
Works best on light, natural fabrics
Can be messy (cover your floors!)
Color predictability depends on fabric composition
Pro Tip:
Fabric softener is a myth BUT I do find that using my homemade fabric medium did keep the paint from stiffening.
Recipe:
25% White Vinager
25% Glycerin
50% Water
Add 50/50 mixture to paint
Steps to Dye Fabric
(Best for textured or synthetic fabrics where dye won’t take evenly)
This is the OG method most people know — and it can work beautifully if you understand how to keep your fabric soft.
The key is in your paint-to-medium ratio. A good fabric paint medium (like the one I DIY myself) helps pigment bond with fibers while keeping flexibility. Spoiler alert: fabric softener doesn’t do that. I tested it so you don’t have to — and it’s officially a myth.
Pros:
Strong color control — what you see is what you get
Works on most fabric types
Great for precise patterns or full-coverage transformations
Cons:
Can stiffen fabric if over-applied or undiluted
Requires light sanding between coats for a soft feel
Needs sealing or waxing for durability unless you use an all-in-one paint like Miss Lillian's
Sue’s Insider Tip:
Thin layers are your friend! Think “build-up of color,” not “slather it on.”
STEPS:
1. Clean the fabric thoroughly
Vacuum, then wipe down with a damp cloth and mild cleaner.
2. Lightly mist the fabric
Use a spray bottle to dampen—not soak—the upholstery. This helps the first coat grip and absorb instead of sitting stiff on top.
3. Grab your paint
Use an All-In-One paint like Miss Lillian's Paint and mix 50/50 with water or my DIY fabric medium (I DON'T use fabric softener—my video explains why.) You want a thin first coat that acts more like a stain than a layer of paint.
4. Apply the first coat thinly
Brush in multiple directions to work it into the fibers. This coat won’t look good yet—it's supposed to be patchy.
5. Build color slowly
Add 1–2 more coats, slightly thicker each time. Let dry between coats. This is where the transformation happens.
6. Sand lightly between coats
A quick buff with a fine sanding pad keeps the surface soft and prevents stiffness. (Yes, sanding fabric—it works!)
7. Let cure before heavy use
Light sitting after 24 hours, full use after a few days.
Best for: dramatic transformations, covering damaged or uneven fabric, and creating a tactile, leather-like surface made entirely from layered paint.
I created this method of painting fabric as an experiment while I was going through a rough emotional patch. I had intended to paint a couch pink but found that pouring out random colors straight from the jar was downright cathartic!!!
I tested a small area to see if my theory (that multiple paint layers could feel like leather) was actually possible.
Spoiler alert-It was!
1. Clean the fabric, then release expectations🤣
Vacuum and wipe down the piece. Don't stress major stains. They will be covered.
2. Start with an All-In One Paint
Full Transparency-have only tried this method with Miss Lillian's Paint. This paint works because it is highly pigmented, has enough flexibility to not crack, and has a built in topcoat.
3. Apply paint in multiple directions
Use a brush, scraper, or even your hands to spread and push paint into the fabric. This creates the first “skin” layer.
4. Layer contrasting colors
This technique works because of color chaos:
Deep tones
Bright tones
Metallics
Neutrals
Let each color peek through the next. This is what ultimately gives that leathery depth. (Note: The chenille pattern of my sofa in the video gave me a raised pattern to work with for this part.
5. Build layers until the surface changes
Once you’ve added 4–6 layers, the fabric stops feeling like fabric. It becomes flexible, pliable, and slightly irregular — exactly like leather.
This is what happened with Regina the Rage Couch: the emotion + layering created a new material.
6. Sand lightly to soften
A gentle sanding knocks down sharp texture and leaves behind “leather micro-creases.”
7. No Need to Seal
Use I have only tested this with Miss Lillian's All-In-One paint and this paint requires no topcoat or sealant. Once you get the feel and colors you want you are done.
9. Cure fully
This technique creates a new skin, so give it time to set before normal use.
Best for: real leather, faux leather, vinyl, pleather, boots, jackets, chairs, ottomans, and accessories. If it’s smooth, shiny, or “unpaintable,” this method handles it.
1. Prep with First Step Prep
Leather holds onto oils more than fabric. Spray or wipe on First Step Prep to remove:
Body oils
Dirt and grime
Silicone conditioners
This gives you the strongest possible bond.
2. Lightly sand to create micro-grip
Use a fine sanding pad and give the surface a gentle scuff.
You're not trying to scratch the leather—just opening the pores so the paint can adhere.
3. Paint with Miss Lillian’s All-In-One Paint
This is your workhorse paint for leather and pleather because it dries flexible and durable.
Use:
Regular colors for solid coverage
Metallics for shimmer, depth, and leather-like richness
4. Apply thin coats
1st coat: thin and streaky
2nd coat: smoother
3rd coat: full coverage
Thinner layers mean no cracking, even on flexible items like boots or jackets.
5. Add texture, blending, or metallic effects
Miss Lillian’s Metallics give an amazing leather finish when used for:
Dry brushing highlights
Two-tone blending
Creating depth in seams and edges
Adding a subtle sheen to mimic real worn leather
This is the secret to high-end results.
6. Seal ONLY if needed
Miss Lillian’s All-In-One Paint has a built-in topcoat, so on most leather pieces you don’t need an additional sealant.
Seal only when:
Painting high-wear clothing
Painting boots that bend a lot
7. Let it cure completely
Wearable items: 24–48 hours
Furniture: gentle use after 2–3 days, full use after 1 week
8. Care and cleaning
Just wipe with a damp cloth.
Avoid oils, conditioners, or leather balms — they can soften the finish.a
Best for: adding iridescent depth, shimmer, and multidimensional color to painted leather furniture, boots, jackets, and accessories. Works beautifully over Miss Lillian’s All-In-One Paint.
1. Make sure your painted leather is fully dry
Let your Miss Lillian’s base color dry completely—at least a few hours. You want a stable surface before layering shifters.
2. Choose your shifter style
Every Sue-per Shifter gives a different effect:
3. Apply using a light hand
Your shifters work best when applied sparingly:
Use a soft brush, or your fingers
Tap or swirl lightly over raised areas
Build slowly—don’t smother your base coat
Think “whisper of shimmer,” not “full coverage.”
4. Layer for dimension
Add shifters in multiple tones for a luxe, almost dragon-skin effect:
A cooler shifter in the shadows
A warm or gold shift on highlights
A micro-pop along seams or wrinkles
This is where the leather really comes alive.
5. Blend the edges
Use a soft, dry brush to feather the edges so the shimmer seems baked into the leather—not sitting on top of it.
6. Let dry and assess
Shifters change color based on the angle of the light so make sure to step back and look from all angles to avoid patchiness or streaks.
7. Buff to Seal
Most of the time, Sue-per Shifters don’t need sealing. All you need to do is buff the wax to harden it and make it shine.
Seal only when:
It’s a high-use area (boots, seats)
You can use one of my lusters or a leather sealant of your choice after the wax has cured for at least 2 week.
8. Cure before use
For accessories: a day is fine.
For furniture: give it a few days to fully set.
Painted upholstery isn’t just a trend—it’s one of the most affordable, creative, and empowering ways to reinvent your home. Whether you’re painting a couch, refreshing a tired armchair, giving new life to leather furniture, or adding bold maximalist energy to your space, these techniques prove that any piece can become a showstopper.
From dyeing fabric, to painting upholstery, to leatherizing with layered texture, to transforming real leather with Miss Lillian’s All-In-One Paint, to finishing with Sue-per Shifters for that iridescent dopamine décor glow—you now have every tool and technique you need to start your own custom makeover.
And the best part?
You don’t need to buy new furniture. You just need the right products.
If you're ready to begin your painted upholstery journey:
👉Grab the products I use in every tutorial👉 Sign up for my newsletter for new techniques, exclusive sales, and project ideas
👉 Shop my favorites: First Step Prep • Miss Lillian’s All-In-One Paints • Metallics • Sue-per Shifters
👉 Tag me in your projects so I can cheer you on! @Tanglewoodsue
👉 Join my Maximalist group to show off your work and ask more questions so I can cheer you on! @Tanglewoodsue
Your next favorite piece isn’t sitting in a store—it’s already in your home.
Let’s paint it, shift it, leatherize it, and make it Sue-per. XOXO, Tanglewood Sue


