
How to Use Alcohol Ink in Your Furniture Makeover
An Alcohol Ink Furniture Makeover Journey: Pushing yourself or being pushed, which pushes harder?
In today's blog, I'm not only going to show you how you can use alcohol inks to completely transform glass furniture, but also how you can be inspired to push your creative boundaries in unexpected ways.
Common questions I will answer
- What are alcohol inks for?
- What surfaces can you use alcohol ink on?
- Is there a difference between alcohol ink and acrylic ink?
Alcohol Ink Furniture Makeover Chapters
The Story Behind This Alcohol Ink Project
Back in the 90's (that's 1990's people!) I owned and operated my own video post production facility in San Francisco called Pink House Post. I was a video editor for many years and most of the time I pretty much took the lead in the composition of the story. In this role, I would review all the clips, look at the director’s notes, select the best takes, ignore the director’s notes and then build up a story.
I would also employ the old editor’s trick of saving your favorite edit and then showing your client an almost replica of that sequence with one pretty major issue. The director or producer would of course see that issue and then tell you to “fix that right away!”. That “fix” would bring you back to your original edit, you pressed export, and you got to go home.
I know. Pretty calculated huh? Well, the alternative was to show the original sequence and then spend the next 5 hours “Fixing something? I can’t quite tell what? maybe move that over? or move that to the beginning? or slow that down or speed that up?…” Only to end up basically where we started.
What’s the lesson here?
Everybody wants a say.
Every client wants to be a part of the creative process even if they say that they just want you to do it all. They don’t. Trust me. Everybody wants to mark their territory. Lets just be glad not everyone pees on it. :)
So, one day this producer walks in and takes a look at my work and says, “Good start now take that image from 30 frames down to 5”. Now, 30 frames is approximately one second, so he wanted me to basically make it a flash of an image instead of a visual. Keep in mind, this is probably 1993. Jump cuts were not a stylistic storytelling device. (We all followed the rules laid out in the famous editing book In the Blink of an Eye) They were considered an error and cause for firing. This guy wanted me to take the next 30 images and make them into 30 flash frames!
WHAT?!?!?!?
I kept arguing with him. “You won’t be able to see the images, it will be too fast, it looks great right now”, I kept saying. This director had a vision. One that I could not see. One that I fought because I thought I knew better. I was wrong. I did what he asked, and it was like magic. Like we just jumped ahead nearly 3 decades to your standard Nike ad or TikTok montage.
I was a bit embarrassed, as I should have been, but I was also reminded that embracing the ideas of people who have a vision I can’t see, can be very exciting. Almost ALWAYS, I'm the one trying to convince someone to add flash frames, or in my case, a hint of purple, or some gold leaf, or another layer of decoupage...
I’m always trying to convince someone of an idea or design. I’m always doing the pushing.
That’s why I LOVE working with designers for my custom furniture painting services. I think I have a pretty good idea of what I can do to bring their dated furniture to life and then BAM! They have an idea that builds on mine and takes it to another level. They start pushing me farther than my own vision could see.
I don’t do a whole lot of collaboration, so these moments are super fun for me. I think back to my 1993 self and resist the urge to say, ummmm- no, and to really try to see how someone else’s vision can elevate mine.
So fast forward to 2021 and I’m recreating an entire bedroom suite for an interior designer in Florida who is redesigning an entire house in Virginia. Such is the life of an established designer.
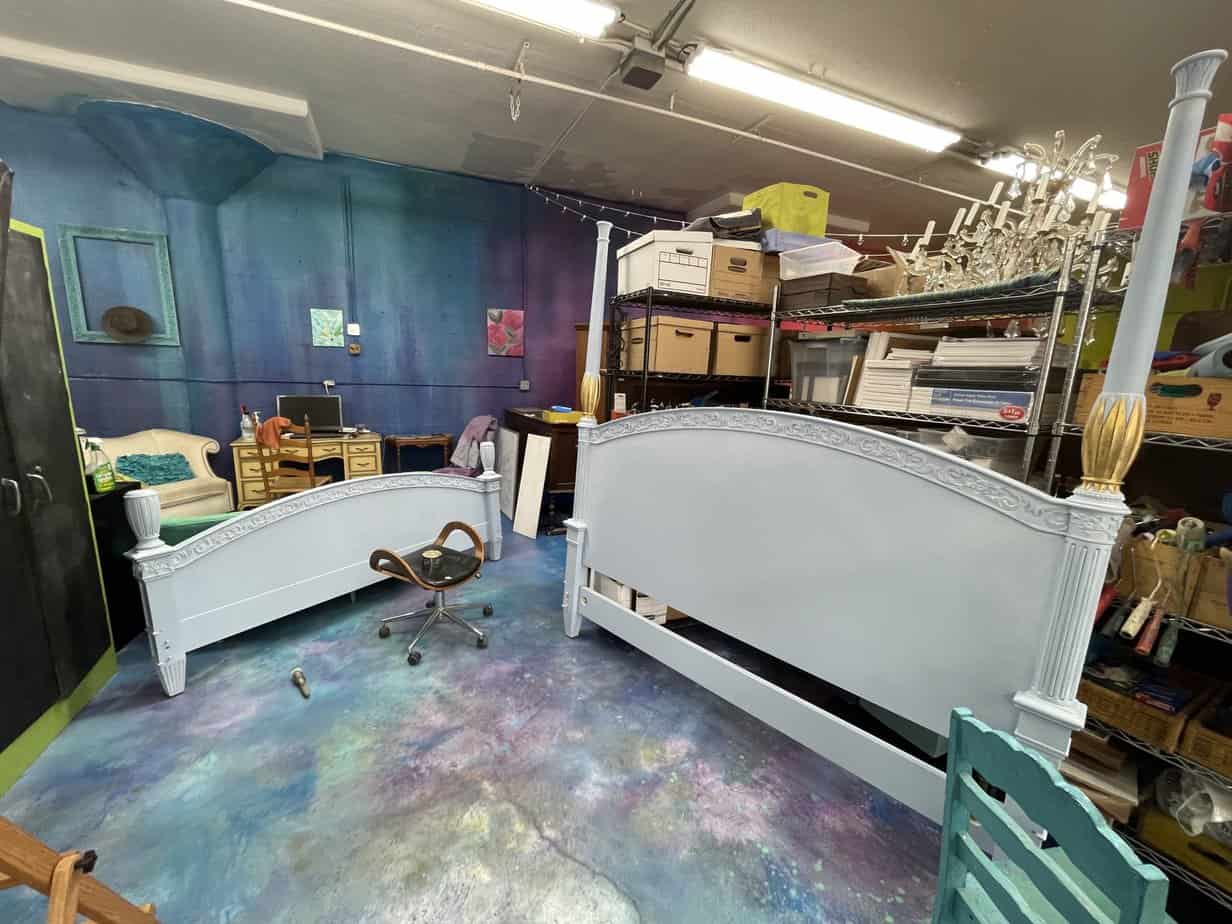

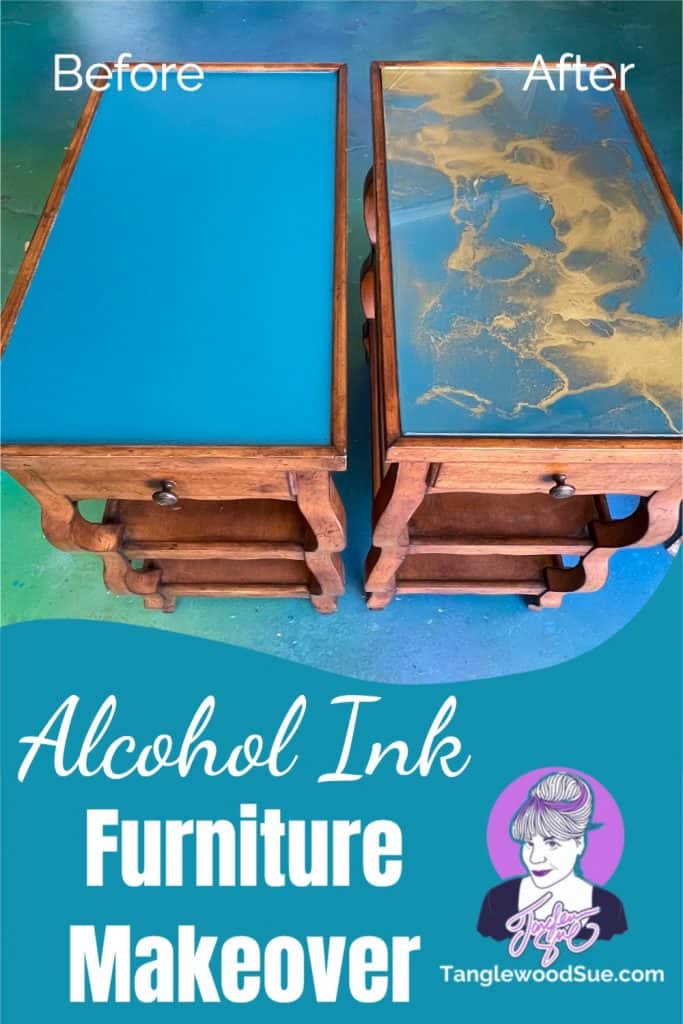
I have reinvented the biggest 4 poster bed I have ever seen, turned an 80's baroque replica dresser into a cerulean dream dresser, and I'm writing up the invoice.
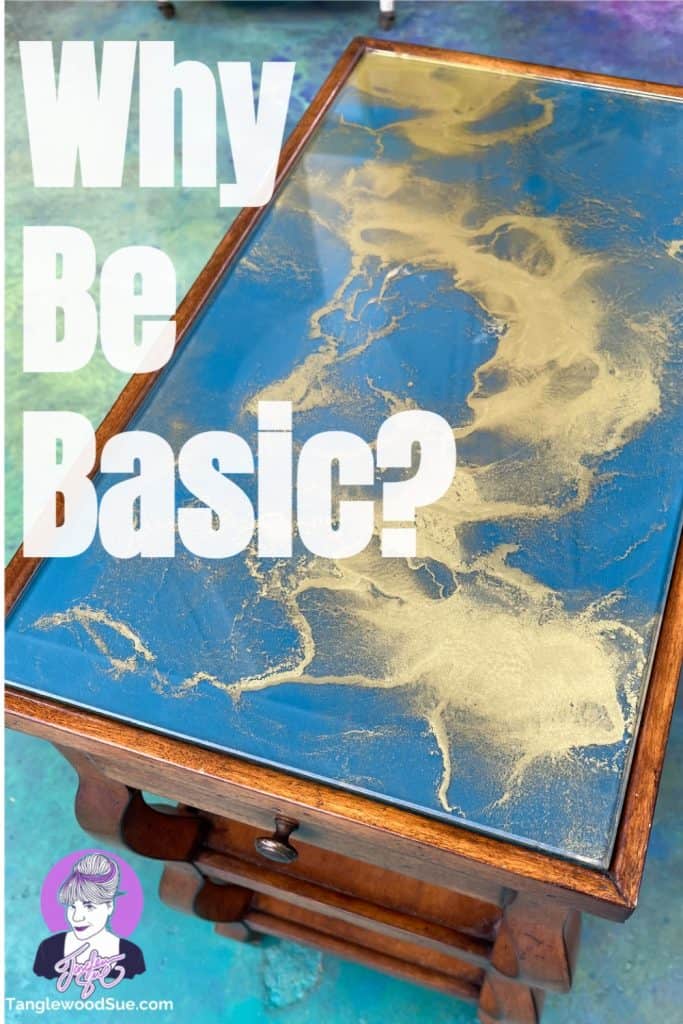
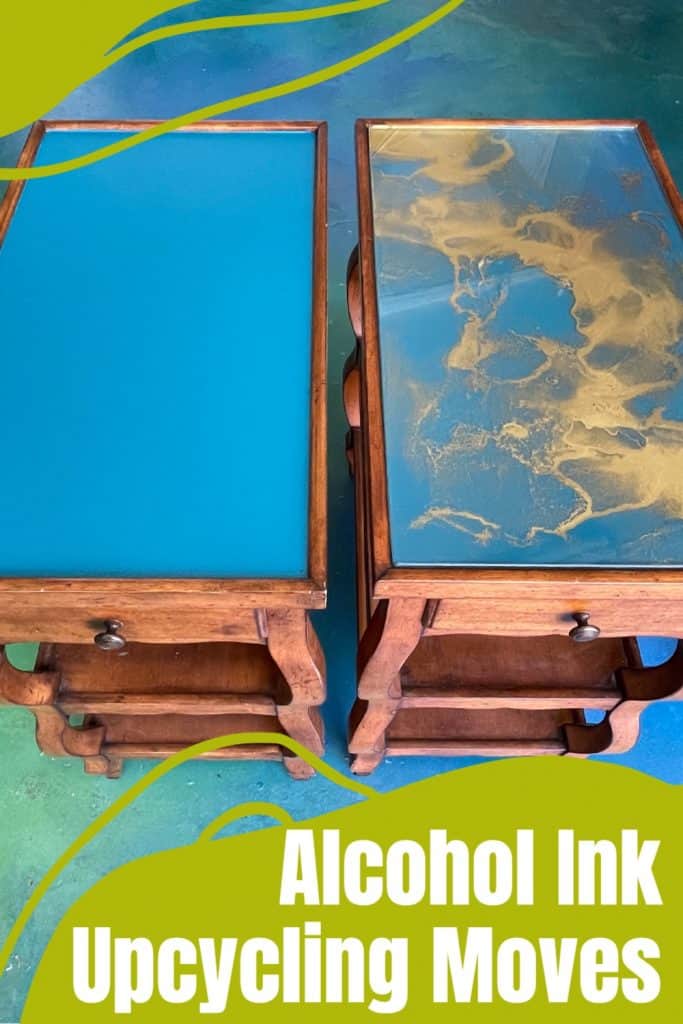
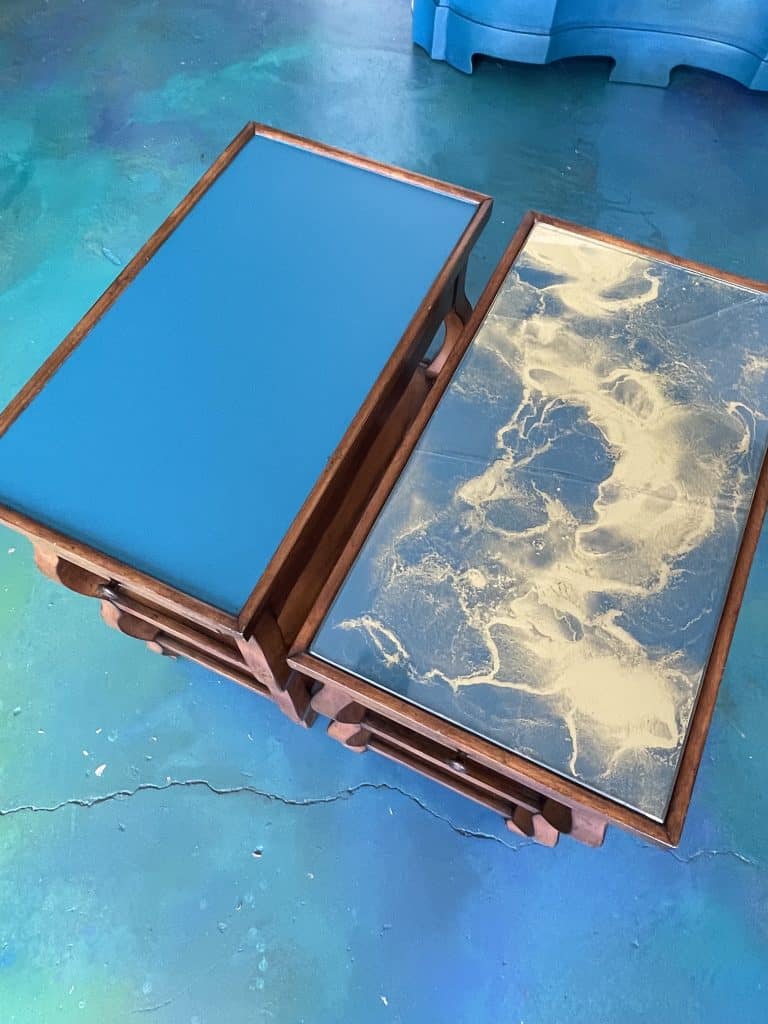
At the last minute, she throws in these two wooden side tables.
The wood is in great shape, so I don’t really want to ruin them, but they are very dated . Think 1990's Cost plus world market faux BoHo.
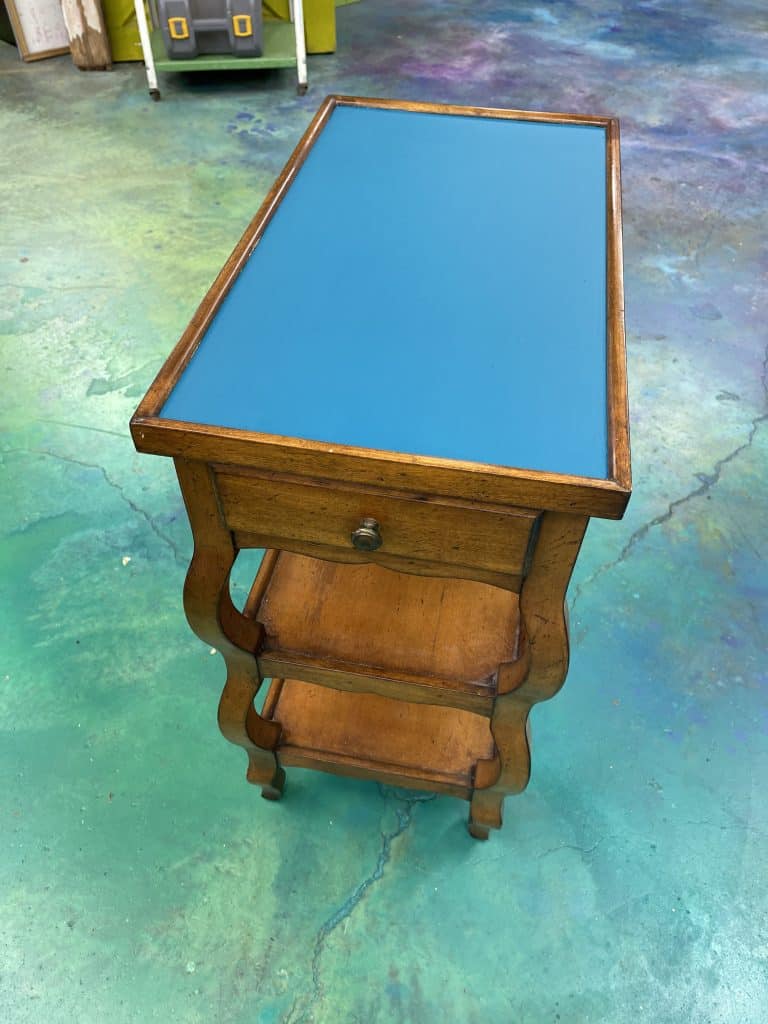
I want to revamp them but in a more 2021 kinda way. I suggest that instead of painting them a solid color and losing the nice wood we just paint the tops with a pop of turquoise. A little unexpected surprise. This is where it gets fun.
I can’t remember who suggested the glass tops but at some point, this designer said “And What about some gold on the glass?”
Now 10 years ago I would have been like Huh? How will that work? What will stick? How will the color come through? I dunno about this…
But luckily, not only have I learned to embrace these crazy moments, all the experimenting I have done for the last 10 years gets to finally come to fruition.
I DO know what ink will do this! (Ranger Alloys by Tim Holtz)
I DO know how to apply it creatively! (using alcohol and a blower)
I DO know how this will complement the painted surface!

I DO know how to make this work with alcohol ink!
What I realized is that it’s so much easier to say YES to the unexpected when you are more skilled in your craft, and you’ve taken the time to experiment on things that, at the time, seemed random, but have finally found their purpose.
If I had been practicing my editing more in different styles and rhythms (instead of sowing my 20-something oats in San Francisco back when it was filled with artists, not Google employees), I might have jumped at the opportunity to try out a different technique.
What I realized as well is, that I did not LOVE editing enough (back then) to have a toolbox full of ideas. I wanted to do what would work and get me out of that stuffy room filled with sugary snacks I could never resist. (they leave bows of candy everywhere to keep us awake so after a weeklong edit you are crashing hard and 5 lbs. heavier on average)
So flash forward to now, when I completely and utterly LOVE what I do I only want to practice every technique I can dream up. All day. Every Day. (And I've found my love of editing again now that there are not so many rules! and producers...)
Yes. My family literally has to call me home each night for dinner or I would just keep experimenting.
So let's get back to these tables...
Since I had already practiced painting on glass with alcohol inks (with my tiles and my candles) it was a no-brainer to come up with this technique that totally wowed my clients. Alcohol inks are transparent inks used primarily on non-porous surfaces to create colorfully vibrant art.
Unlike acrylic paint, inks are transparent and can be reconstituted with alcohol. They can also be blended to create innumerable colors.
Supply list for Alcohol Ink Furniture Makeover
All you need are these supplies & tools:
You can find most of the supplies right here from my Amazon affiliate link.
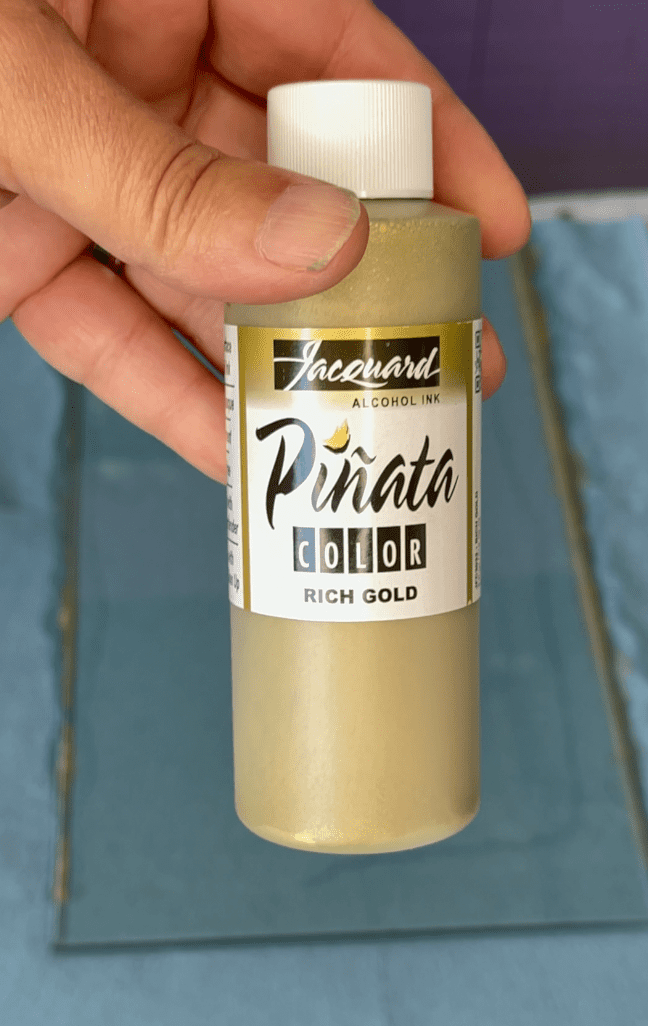
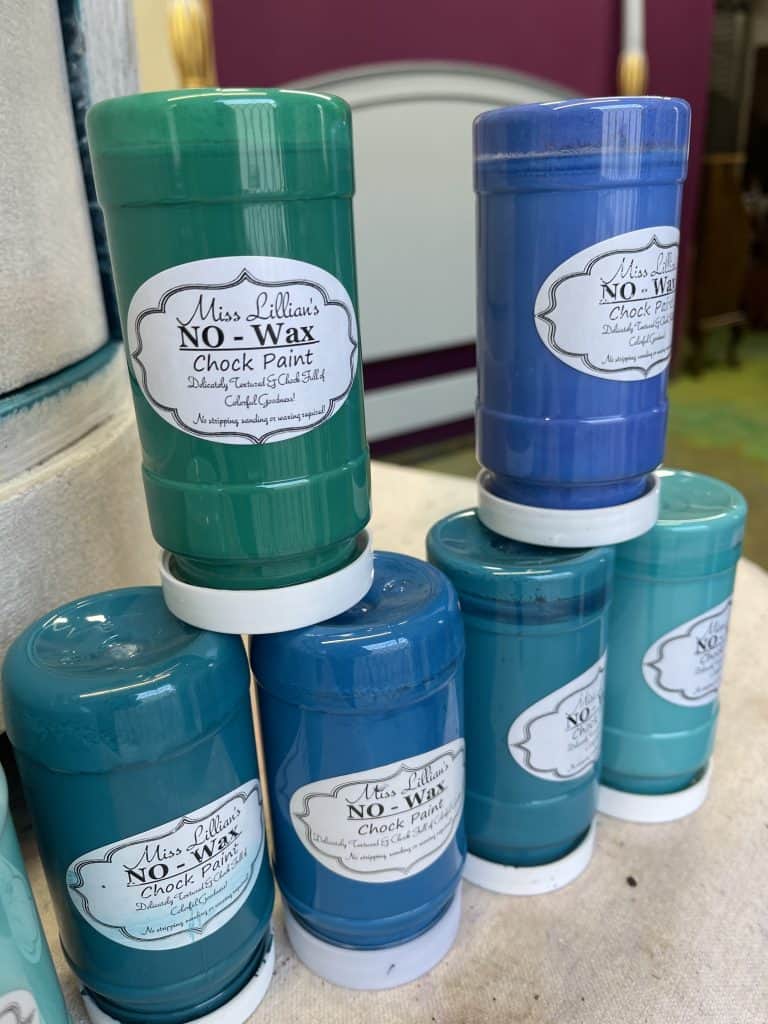
Ranger Alloys Alcohol Ink by Tim Holtz (In the video, I used Pinata, but now I sell an even better product for this).
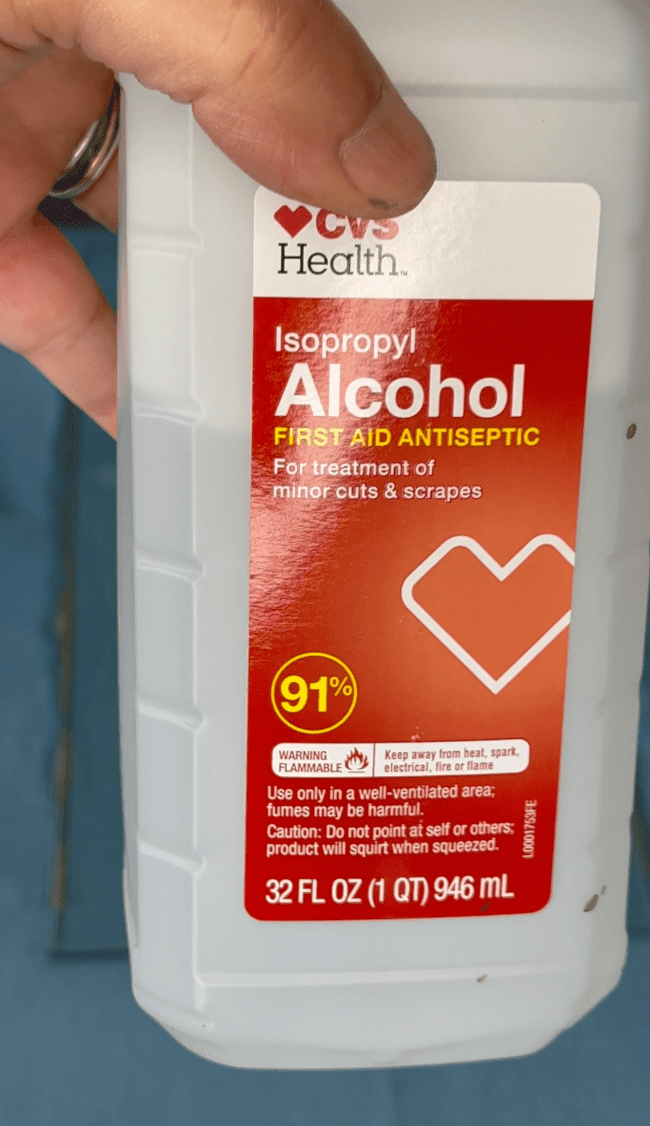
- Isopropyl Alcohol over 90%
- Blending Solution
- Gloves
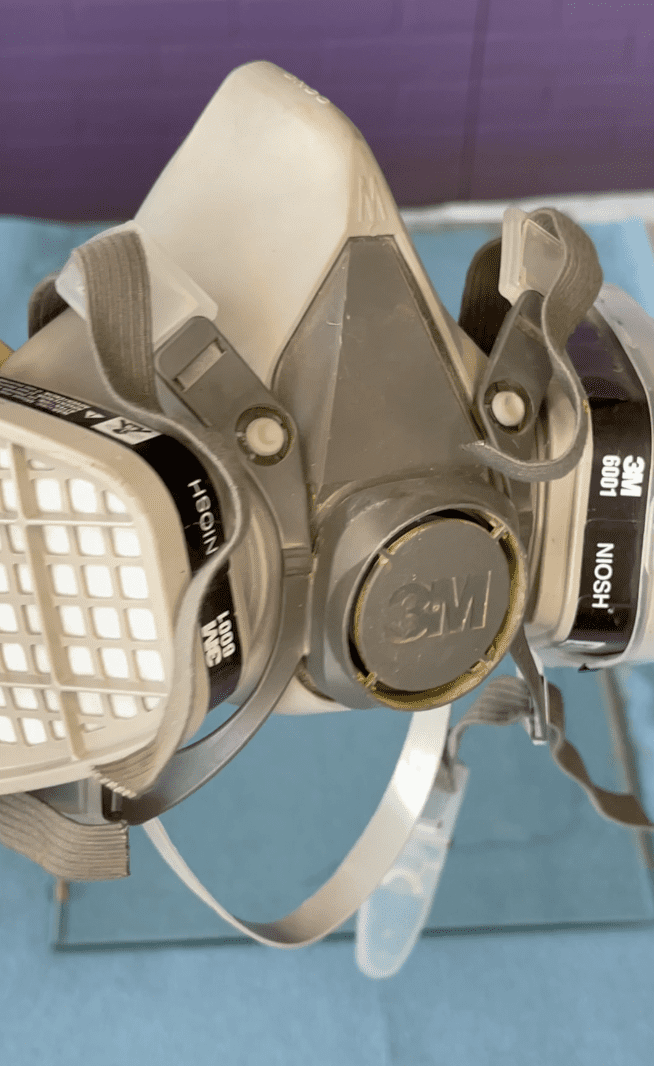
- N95 mask
- alcohol ink
- Shop towels
- Compressed air (can or airbrush or hair dryer)
Alcohol Ink Tutorial Time!
For this Tutorial, you are really gonna need to watch the video but I will do my best to break it down.
Choose Background Color
The first step with these tables in particular was to choose a background color. We are working backwards, so this is the color that will shine through the metallics and it is going onto the wood below.
If I were to adapt this technique to a glass piece without a wooden base underneath I would add this color last directly onto the glass. (This will have to be another experiment thought)
So the base is painted in Bohemian Queen and then I had tempered glass measured and cut to fit on top. Luckily this table had a ridge for the glass to nestle into. If it didn't, no worries, I would have just had to pay a little more to get the glass beveled or curved around the edges. Alcohol inks work best on non-porous surfaces so glass is the perfect surface for them. Glass, metal, and Yupo paper are all great for blending inks. (Side note: I have found that alcohol inks also work great on porous surfaces and even fabric)
Test It Out
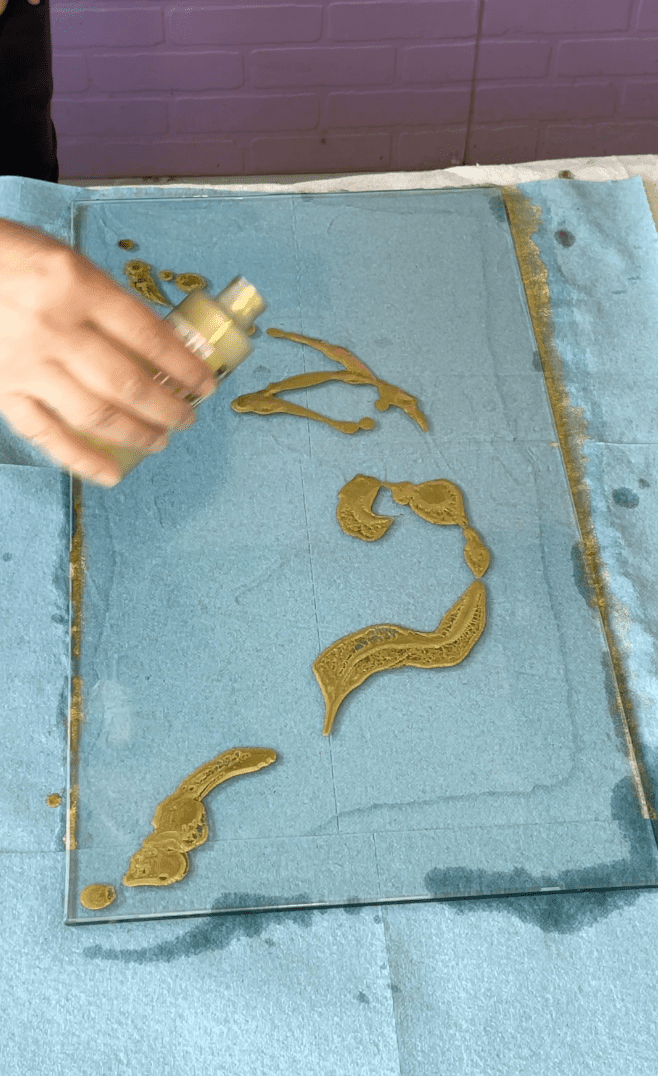
At this point, I did a test on some glass scraps to make sure that my idea would work AND to practice my moves.
I want to create an abstract, yet visually pleasing metallic gold design. You can also use one of the many vibrant colors or even pearls that are available today. If I were doing color I would just make sure my background was white or another bright tone to let the colors pop against.
I also wanted the gold to be mostly transparent, and I know from experience that gold fixatives by Ranger Inks are opaque whereas gold alloys are able to be dispersed for a more sheer effect.
I only know this because of how many alcohol experiments I have done over the years, not even counting all the keg stands!
Have You Alcohol Ink Materials Ready
So the trick is to have everything at the ready.
- Your Isopropyl alcohol
- Your metallic of choice (you can do this in gold, silver, rose gold or even bronze I think)
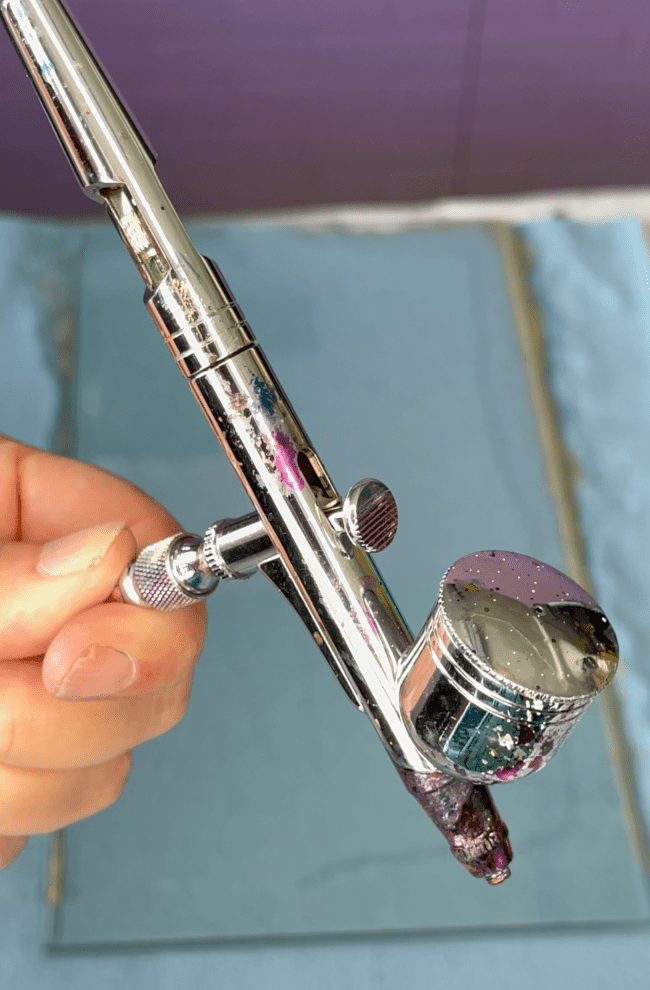
- Air blower.
Not everyone has an industrial air compressor, I know. However, now you can get really cool USB air blowers, or grab some canned air.
Get Started
Basically, I spread out the alcohol, poured on the gold and blew!

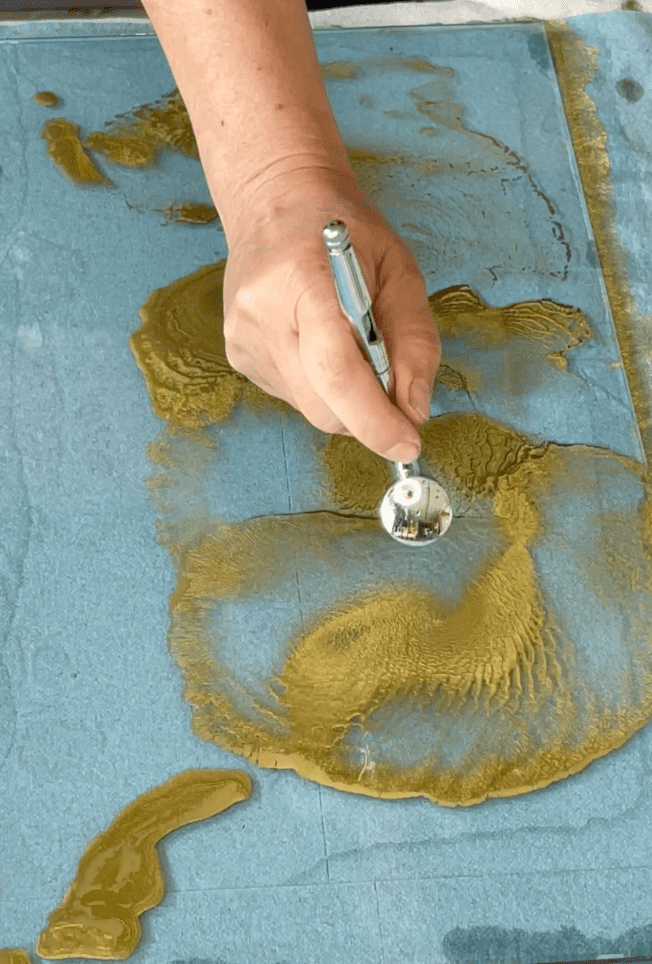
You may get it just right the first time. you may need to wipe it all down and start again. Yes. you can do that. Just wipe it off. It's not done till we seal it.
Now what happened to mine is that the condensation from my blower left a residue. Luckily, I realized that dabbing a bit of the alcohol cleaned that right up.
Optional: Seal It
Now if you are placing your piece upside-down onto a surface like I am, I would not risk a sealant. Nothing will be as crystal clear as the glass. Once you put it on the furniture, the glass itself is the protective layer (as long as no one removes the glass that is)
If you want to seal it for your own purpose use Kamar varnish to first "fix" the ink so it will not run and then I would use a clear spray. Do a test first to make sure you get the effect that you want. I would not use a brush for fear of smearing your design.
The possibilities for this technique are endless.
Think of any boring glass that you want to spice up! If you are a resin aficionado you could do this same effect with resin and never need to worry about a topcoat.
Anyway, as my producers and designer clients have inspired me, I hope that I have been able to inspire you. If only to experiment with your craft for the sheer joy of experimenting. You may not know what you are training for exactly. When the perfect opportunity to use that skill arises, you will be ready!
Happy painting everyone,
Tanglewood Sue